Androidアプリ開発 (kotlin) - 動的Layout編 その2
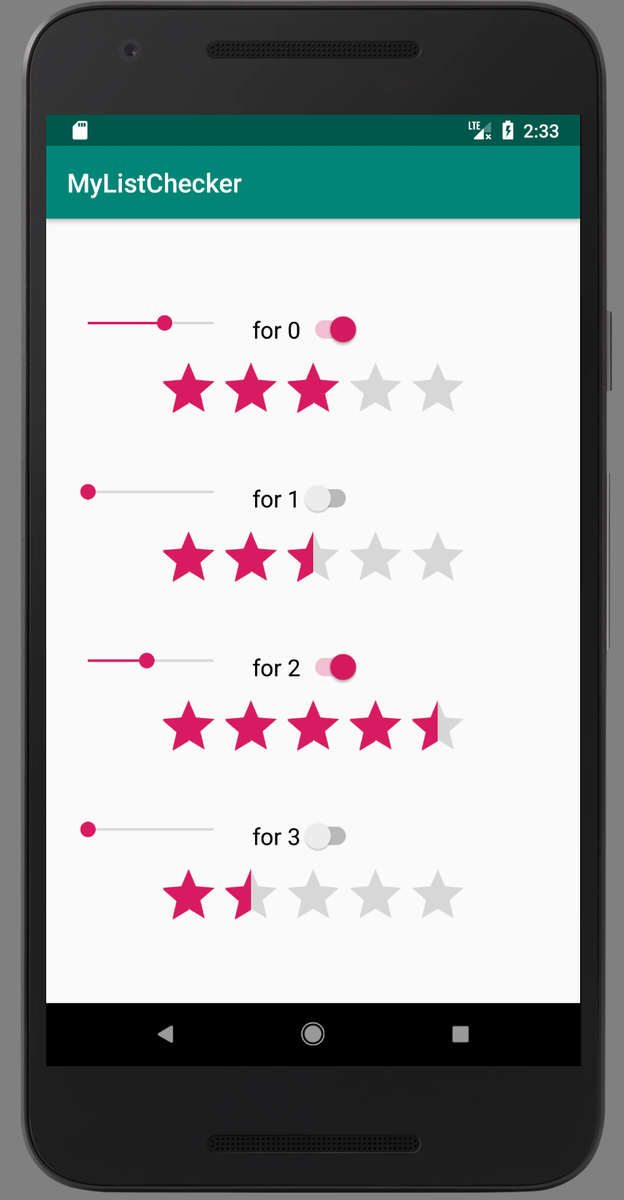
前回からすこし発展させる.前回はTextViewを複数個並べていたが,今回は複数のViewが配置されたViewの塊を複数個並べる.
目標レイアウト

Layoutの定義
空っぽのLayoutを作って画面に追加する.前回と同様にLinearLayout (Vertical)を使用.
val layout = LinearLayout(this)
layout.layoutParams = ViewGroup.LayoutParams(ViewGroup.LayoutParams.MATCH_PARENT, ViewGroup.LayoutParams.MATCH_PARENT)
layout.gravity = Gravity.CENTER
layout.orientation = LinearLayout.VERTICAL
setContentView(layout)
このlayoutにサブLayoutを複数個追加するというアプローチ.
サブLayoutの定義
Viewを複数追加したサブLayoutはこのようになっている.これはxmlファイルで定義している.

xmlの中身は下記の通り.ConstraintLayoutという枠の中にSwitchとSeekBarとRatingBarを適当に配置している (特に意味はない).これはGUI操作で配置した.ここでのポイントはConstraintLayoutのlayout_heightをwrap_contentとしている部分である.これによって,ConstraintLayoutの高さは中に入っているViewを全て表示するために十分なだけの高さになる.match_parentとするとこのサブLayoutが画面の大きさと一致するので無駄に大きいViewになってしまう.
<?xml version="1.0" encoding="utf-8"?>
<android.support.constraint.ConstraintLayout
            xmlns:android="http://schemas.android.com/apk/res/android"
            xmlns:app="http://schemas.android.com/apk/res-auto" xmlns:tools="http://schemas.android.com/tools"
            android:layout_width="match_parent"
            android:layout_height="wrap_content"
            android:id="@+id/one_of_list">

    <Switch
            android:text="Switch"
            android:layout_width="wrap_content"
            android:layout_height="wrap_content"
            android:id="@+id/switch1" android:visibility="visible"
            android:textAppearance="@style/TextAppearance.AppCompat.Medium" app:layout_constraintTop_toTopOf="parent"
            app:layout_constraintStart_toStartOf="parent"
            android:layout_marginLeft="159dp" android:layout_marginStart="159dp"
            app:layout_constraintEnd_toEndOf="parent" android:layout_marginEnd="160dp"
            android:layout_marginRight="160dp" app:layout_constraintBottom_toBottomOf="parent"
            android:layout_marginBottom="16dp" app:layout_constraintHorizontal_bias="0.0"
            app:layout_constraintVertical_bias="0.341"/>
    <SeekBar
            android:layout_width="129dp"
            android:layout_height="29dp"
            android:id="@+id/seekBar" app:layout_constraintEnd_toStartOf="@+id/switch1" android:layout_marginEnd="8dp"
            android:layout_marginRight="8dp" app:layout_constraintTop_toTopOf="parent"
            android:layout_marginBottom="8dp" app:layout_constraintBottom_toBottomOf="parent"
            app:layout_constraintStart_toStartOf="parent" android:layout_marginLeft="8dp"
            android:layout_marginStart="8dp" app:layout_constraintHorizontal_bias="0.571"
            app:layout_constraintVertical_bias="0.258"/>
    <RatingBar
            android:layout_width="wrap_content"
            android:layout_height="wrap_content"
            android:id="@+id/ratingBar" android:layout_marginTop="8dp"
            app:layout_constraintTop_toBottomOf="@+id/switch1" app:layout_constraintStart_toStartOf="parent"
            android:layout_marginLeft="8dp" android:layout_marginStart="8dp" app:layout_constraintEnd_toEndOf="parent"
            android:layout_marginEnd="8dp" android:layout_marginRight="8dp" android:layout_marginBottom="8dp"
            app:layout_constraintBottom_toBottomOf="parent"/>
</android.support.constraint.ConstraintLayout>
コードでxmlで定義されたサブLayoutを読み込む
サブLayoutを読み込むにはlayoutInflater.inflateという関数を使う.第一引数はR.layout.[xmlファイル名]である.第二引数は親Layoutを指定することができる.nullではなくsetContentViewに指定されているLayoutを指定するとaddViewされたことになり,画面にサブLayoutが表示される.
val mylayout = layoutInflater.inflate(R.layout.one_of_list, null)
各Layoutに入っているViewの値を書き換える
Switch Viewのtextを書き換えることで,それぞれのサブLayoutに違いを生み出すことができる.
1行目でサブLayoutのインスタンスmylayoutからfindViewByIdでSwitch Viewのインスタンスを読み込み,2行目でtextを書き換える.
val switch = mylayout.findViewById<Switch>(R.id.switch1)
switch.text = "あああ"
for文でサブLayoutを追加していく
最後にfor分でサブLayoutをLayoutに追加する.
for (i in 0..3) {
    // switchのtext
    val text = "for ${i}"
    // サブLayoutのインスタンス作成
    val mylayout = layoutInflater.inflate(R.layout.one_of_list, null)
    // switchのテキストを変更する
    val switch = mylayout.findViewById<Switch>(R.id.switch1)
    switch.text = text
    layout.addView(mylayout)
}
kotlinの文字列はJulia言語のようにInt型等の値を簡単に組み込めるところが良い.
val num : Int = 3
val str : String = "hoge ${num} fuga"
コード全体
package com.soyukkeproducts.mylistchecker

import android.support.v7.app.AppCompatActivity
import android.os.Bundle
import android.view.Gravity
import android.view.ViewGroup
import android.widget.LinearLayout
import android.widget.Switch

class MainActivity : AppCompatActivity() {


    override fun onCreate(savedInstanceState: Bundle?) {
        super.onCreate(savedInstanceState)
        val layout = LinearLayout(this)
        layout.layoutParams = ViewGroup.LayoutParams(ViewGroup.LayoutParams.MATCH_PARENT, ViewGroup.LayoutParams.MATCH_PARENT)
        layout.gravity = Gravity.CENTER
        layout.orientation = LinearLayout.VERTICAL
        setContentView(layout)


        for (i in 0..3) {
            val text = "for ${i}"
            val mylayout = layoutInflater.inflate(R.layout.one_of_list, null)
            // switchのテキストを変更する
            val switch = mylayout.findViewById<Switch>(R.id.switch1)
            switch.text = text
            layout.addView(mylayout)
        }
    }
}